Should You Limit Bandwidth? Not everyone has unlimited bandwidth or connection at their expense. Most Internet Service Provides apply data caps on their Network to counteract excessive use. If your usage crosses that limit, you might have to pay extra, or your service provider may reduce your internet speed. That’s a pretty good reason to monitor your bandwidth and limit it if necessary, right? The vital reasons why you might want to limit Bandwidth, be it for the applications on your PC or the Delivery Optimization feature, could be: To increase connection speed to limit apps from overusing data to stop other users from over-consuming bandwidth How to Change Bandwidth Limit? Changing the bandwidth limit allows you to manage your network usage and optimize your experience. In windows, there are various methods to change the bandwidth limit. You can set bandwidth limits for applications, Windows updates, and Windows services alike. All the methods are explained in detail as follows: Via Windows Settings If you didn’t know, Windows already has a built-in bandwidth limiter. The limiter allows users to limit data usage for applications. If there’s a limit on your data cap, the limiter can help keep your usage under control. Here’s how you can set data limits using Settings on Windows. Open Settings using Windows key + I Go to Network & internet > Advanced network settings > Data usage in the top-right corner, click and select the Network you want to set the limit
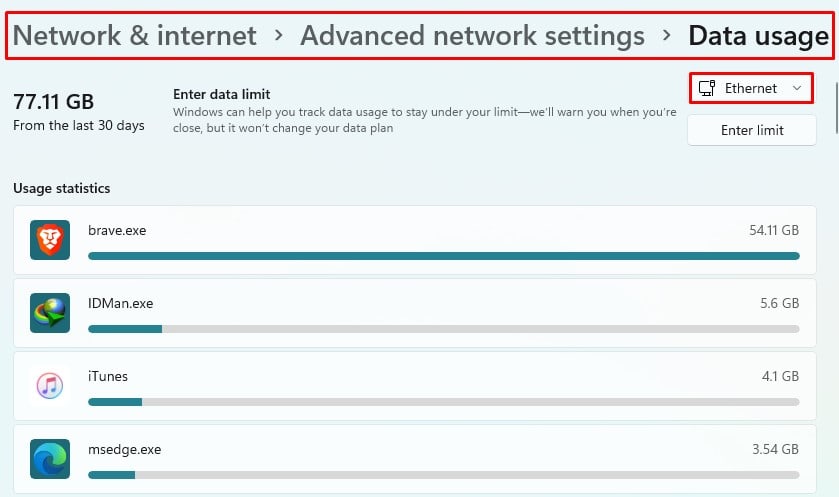
Click on Enter Limit button to set the limit type, reset date, and data limit Hit Save In case there’s already a limitation in place, you can simply select Remove Limit in order to remove it. Setting Metered Connection Using metered connection feature on Windows allows you to track data usage by each app and limit excessive usage. While the metered connection is turned on, the Windows update will also pause the auto-update feature. Here’s how you can set metered connection for Wi-Fi or Ethernet: Wi-Fi Open Settings Head to Network & Internet, Click on Wi-Fi. Choose the Network you want to set the limit to Click on the slider corresponding to Metered connection
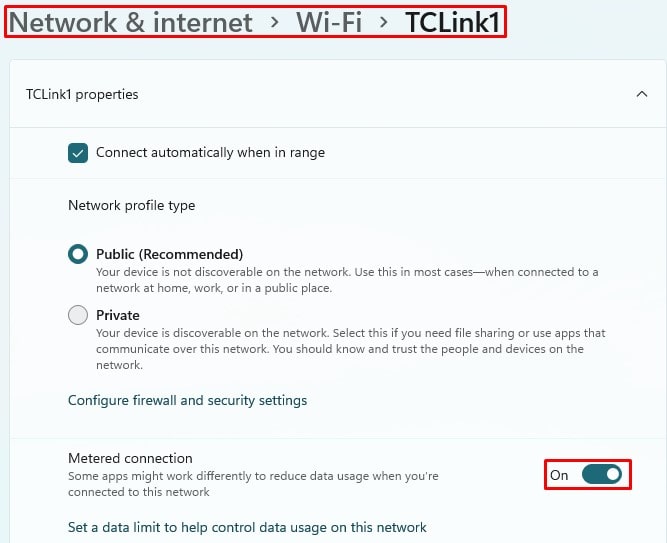
Ethernet Go to Settings > Network & internet > Ethernet Turn on the Metered connection slider Through Delivery Optimization a certain amount of bandwidth is always reserved by Windows to accommodate system activities like: Scan and download updates automatically deliver updates to other users on the Network Check licenses Update apps and other Microsoft products send continuous feedback This feature is called Delivery Optimization, which is turned on by default. Although the delivery optimization feature is essential for the smooth functioning of Windows, sometimes users might face difficulty while using network-heavy applications like games and software that require a strong connection. Fortunately, you can change the reserved bandwidth limit or disable the feature altogether, to lower its impact. To change or disable the delivery optimization feature, follow the steps below: Go to Settings, Select Windows Update. Go to Advanced options. Under Additional options, choose Delivery optimization. Click on advanced options. Now, set the download and upload bandwidth limit as per your convenience. On Windows 10, go to Update & security instead of Windows Update, then follow the same steps as above. Via Local Group Policy Editor, You can also change the bandwidth limit by editing the “Limit reservable bandwidth” entry via the Local Group Policy Editor. Follow the steps mentioned below: Open Run (Windows key + R) Type edit. Scan and click Ok. Navigate to the path: Computer configuration > Administrative Templates > Network > Qts Packet Scheduler. Locate the limit reservable bandwidth entry and double-click on it. Click on Enabled. Under Options, set the bandwidth limit(%) to a lower value. Click Apply and Exit the editor. Via Registry Editor Before moving forward to change the bandwidth limit using the Registry Editor, make sure to back up the registry. Now follow the steps below: Press Windows key + R to open Run Type reg edit and hit ok Navigate through the following path:Computer\HEY_LOCAL_MACHINE\SOFTWARE\Policies\Microsoft\Windows\Psyched If the Psyched key does not exist on your PC, you have to create it manually. Right-click the Windows key and select New > Key, name the key Psyched. Right-click on the empty area and create a WORD (32-bit) value. Name Non Best Effort Limit, Double-click on it and set the value from 1 to 100. Router If you’re using a Wi-Fi network, you can use the router to change or set the bandwidth limit. Most modern routers have a feature called Quality of Service. This feature allows you to set or change the bandwidth limit of your Network. However, the steps to access the QS feature can differ depending on your router. But the basic steps require you to access your router’s settings. To access it, you will need to know the Gateway IP address of your router. To find out the gateway address of your router, follow the steps below: On the Start menu, search for cmd and open it enters the following command:config/from the displayed information, take note of the following: Default Gateway IPv4 Address Physical Address (MAC Address)
Now, to change or set the bandwidth limit, go through the steps below: Head to your browser. Type the Gateway Address on the search bar and hit Enter Fill in your credentials to log in to the router settings Then, go to Advanced settings and look for Quality Of Service enable it and set or change the bandwidth limit How to check Bandwidth Usage? In windows, You can view the bandwidth consumed by various applications and Windows activities through Settings. This allows you to make informed decisions about how to optimize your usage and whether you have to set a bandwidth limit or not. To view the bandwidth usage of respective activities, follow the steps below. Applications To view the amount of bandwidth used by applications, follow the steps below: Open Settings (Windows key + I) Head to Network & internet Select Advanced network settings. Click on Data usage. Here, you can see the data usage of various applications within 30 days. Windows Activities To view the bandwidth usage of Windows system activities, go through the steps mentioned below: Open Settings Select Windows Update Go to Advanced options. Select Delivery Optimization Click on Activity monitor Here, you can view the download and upload statistics and other detailed information on Windows activities.
Enjoyed this article? Stay informed by joining our newsletter!


You must be logged in to post a comment.