

If you're running a commercial kitchen, whether it's a bustling restaurant, a cozy café, or a food truck operation, you've likely heard about grease traps. These essential plumbing devices prevent fats, oils, and grease (FOG) from clogging your pipes and entering municipal sewer systems, avoiding hefty fines and environmental headaches. But when it comes to installing one, the big question is: How long will it take? The answer isn't one-size-fits-all—it depends on factors like the type of grease trap, its size, location, and any site-specific challenges. In this article, we'll break down the typical timeline, step-by-step process, preparation tips, and what to expect post-installation. Whether you're a business owner planning a new setup or a facility manager upgrading an old system, this guide will help you navigate the process smoothly.
Understanding Grease Traps: Types and Why Timing Varies
Before diving into the timeline, let's clarify what a grease trap is. Essentially, it's a plumbing fixture that intercepts grease-laden wastewater from your kitchen sinks, dishwashers, and other drains. There are two main types: passive indoor grease traps (often smaller and installed under sinks) and larger outdoor grease interceptors (like gravity grease interceptors or GGIs), which are buried underground and handle higher volumes.
The installation time can range from as little as 4 hours for a simple indoor unit to 2 days or more for a complex outdoor system. For indoor traps, the process is quicker because it involves minimal excavation and can often be done without major disruptions to your operations. Outdoor interceptors, however, require digging, which adds time and depends on soil conditions, weather, and permitting.
Key factors influencing the duration include:
- Size and Capacity: A small 50-gallon indoor trap might take half a day, while a 1,000-gallon outdoor interceptor could extend to a full day or two due to heavier lifting and more intricate plumbing connections.
- Location and Accessibility: Installing in a tight kitchen space versus an open outdoor area affects efficiency. Urban sites with limited access might need special equipment, prolonging the job.
- Permitting and Inspections: Local regulations often require permits, which can add days or weeks to the pre-installation phase. For instance, some areas mandate compliance within 60 days of a notice of violation for upgrades.
- Existing Infrastructure: If you're replacing an old trap, removal and site prep could tack on extra hours. New builds might integrate faster than retrofits in older buildings.
- Contractor Expertise: Hiring pros with experience in commercial plumbing can shave off time—look for teams that provide upfront timelines during consultations.
On average, expect 4-8 hours for indoor installations and 1-3 days for outdoor ones, but always get a site-specific quote.
Step-by-Step Installation Timeline
Here's a detailed breakdown of the process, with estimated times based on typical scenarios. These are approximations—real-world jobs can vary.
- Pre-Installation Planning (1-7 Days): This isn't hands-on work but crucial for a smooth install. Your plumber assesses the site, measures flow rates, and selects the right trap size. Permits are filed, and materials are ordered. If excavation is needed, utility lines are marked to avoid accidents. Tip: Start this early to avoid delays; some parts might take weeks to arrive if custom-ordered.
- Site Preparation (1-4 Hours): Shut off the water supply to create a dry workspace. For outdoor units, excavation begins—digging a trench or hole sized for the interceptor. This step can extend if the ground is rocky or frozen. Indoor setups might just involve clearing space under a sink.
- Unit Placement and Connection (2-6 Hours): The grease trap is positioned and secured. Pipes are connected to your kitchen drainage system, ensuring proper alignment and leak-proof seals. For GGIs, this includes venting for odor control and access points for future cleanings. Electrical work might be needed if it's an automatic unit with pumps.
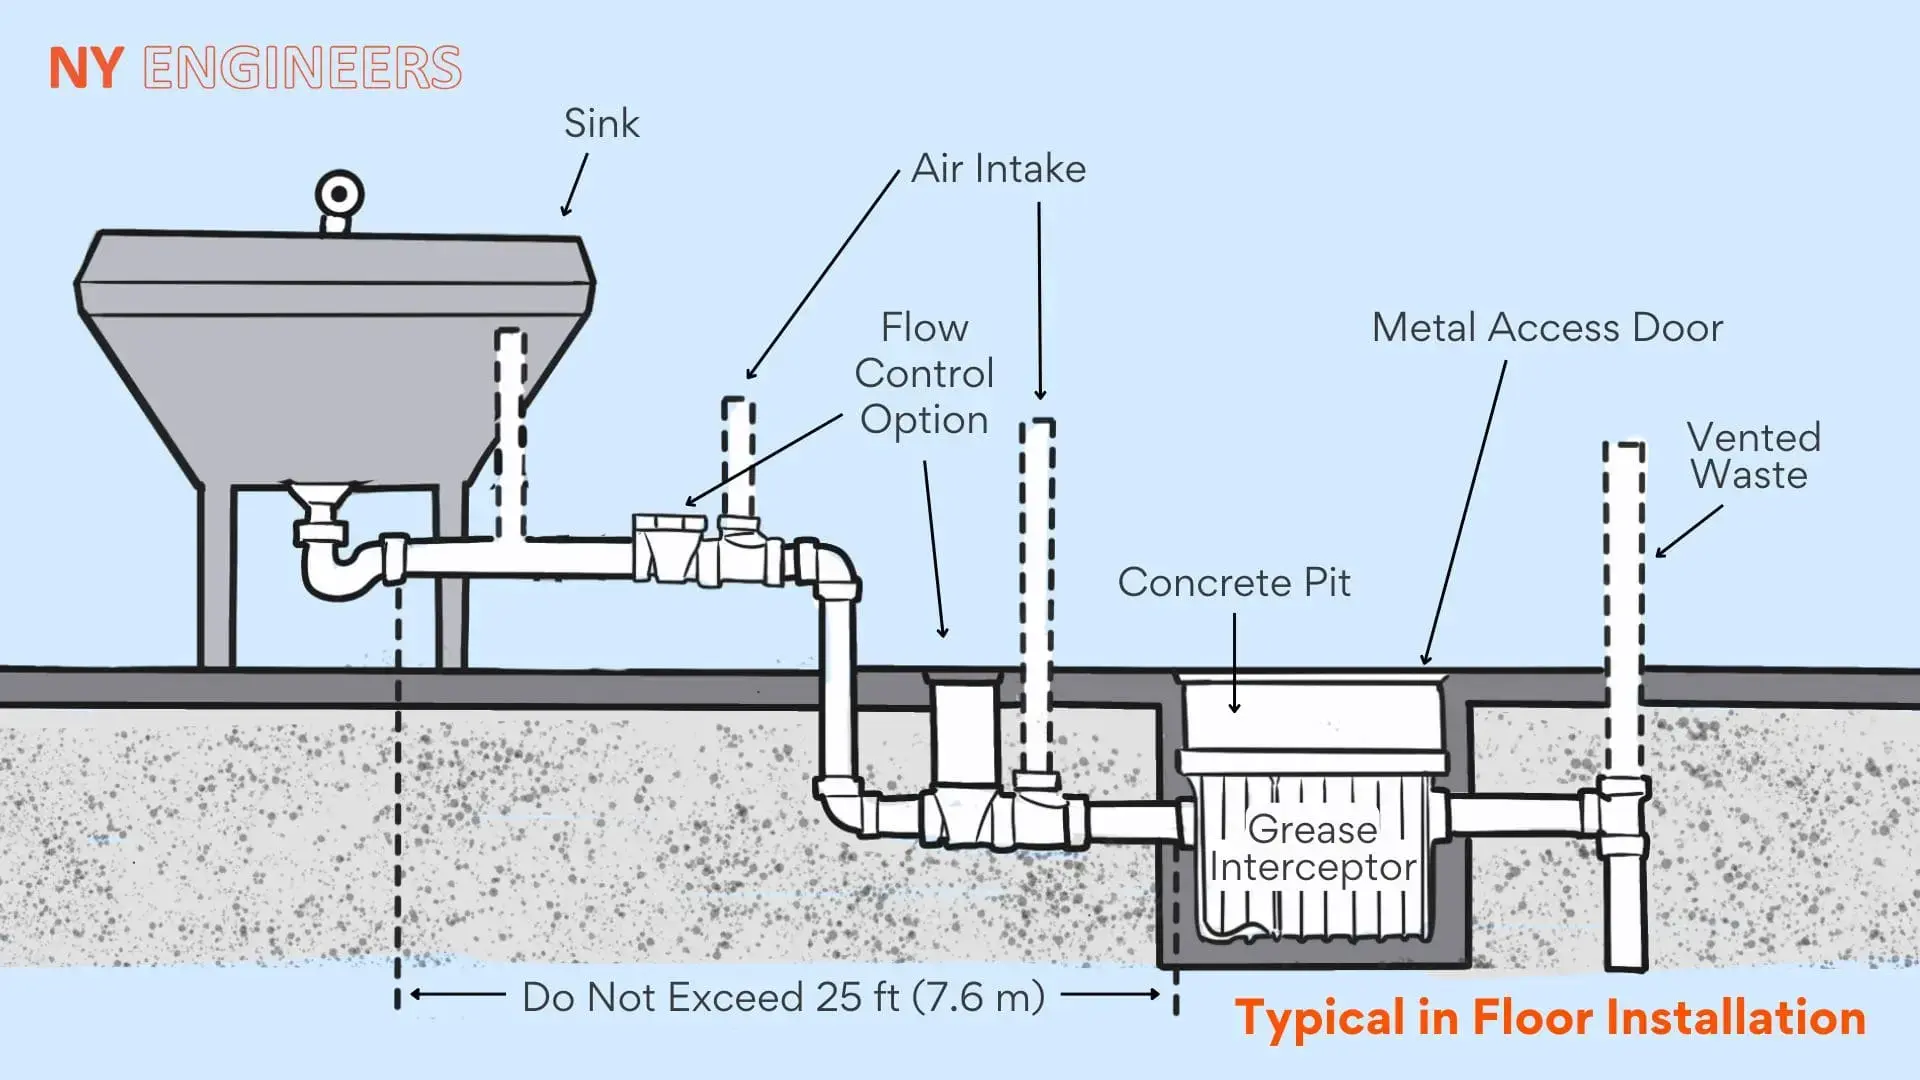
- Testing and Final Adjustments (1-2 Hours): Water is run through the system to check for leaks, flow efficiency, and proper separation of grease. Adjustments are made, and the site is backfilled if excavated. Inspections follow, which could add a day if an official visit is required.
- Cleanup and Startup (30 Minutes-1 Hour): Debris is removed, and your kitchen is restored to working order. The installer might demonstrate basic maintenance.
For a straightforward indoor grease trap, the whole on-site process might wrap up in 4-6 hours. Outdoor installations often span 1-2 days, with Day 1 focused on excavation and placement, and Day 2 on connections and testing. In complex cases, like those involving sand or oil interceptors, it could stretch to several days.

Difference Between Grease Traps and Grease Interceptors - Used ...
Preparation Tips to Minimize Downtime
To make installation faster and less disruptive:
- Schedule During Off-Hours: Plan for slow business days or after hours to avoid closing your kitchen.
- Check Local Codes: Research requirements in advance—some areas, like Arizona, have specific mandates for trap types.
- Hire Reputable Pros: Look for licensed plumbers specializing in commercial grease management. They can handle everything from install to ongoing service.
- Budget for Extras: Costs range from $1,000-$5,000 for indoor traps to $10,000+ for large outdoor ones, including labor. Factor in potential downtime costs.
- Avoid Common Pitfalls: Don't skimp on size—undersized traps fill up fast, leading to frequent cleanings (every 1-3 months). Also, ensure easy access for maintenance to prevent future headaches.
Post-Installation: Maintenance and Longevity
Once installed, your grease trap isn't set-it-and-forget-it. Schedule the first clean-out within 30 days to gauge accumulation rates. Regular servicing—quarterly for most operations—keeps it efficient and compliant. With proper care, a quality trap can last 10-20 years, made from durable materials like stainless steel or concrete.

In summary, grease trap installation typically takes 4 hours to a few days, but planning and expertise are key to keeping it on the shorter end. By understanding the timeline and preparing accordingly, you can protect your business from plumbing woes and focus on what you do best—serving great food. If you're in a high-volume spot, consider consulting a specialist early to tailor the process to your needs. Remember, investing time upfront saves money and stress down the line.

You must be logged in to post a comment.